We have learned how to navigate to a new screen by creating a new route and manage it by using the Navigator. The Navigator maintains the stack-based history of routes. If there is a need to navigate to the same screen in many parts of the app, this approach is not beneficial because it results in code duplication. The solution to this problem can be removed by defining the named routes and can use the named routes for navigation.
We can work with named routes by using the Navigator.pushNamed() function. This function takes two required arguments (build context and string) and one optional argument. Also, we know about the MaterialPageRoute, which is responsible for page transition. If we do not use this, then it is difficult to change the page.
The following steps are necessary, which demonstrate how to use named routes.
Step 1: First, we need to create two screens. The following code creates the two screens in our app.
class HomeScreen extends StatelessWidget {
@override
Widget build(BuildContext context) {
return Scaffold(
appBar: AppBar(
title: Text('Home Screen'),
),
body: Center(
child: RaisedButton(
child: Text('Click Here'),
color: Colors.orangeAccent,
onPressed: () {
//
},
),
),
);
}
}
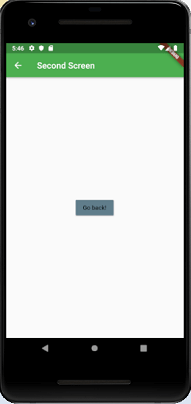
class SecondScreen extends StatelessWidget {
@override
Widget build(BuildContext context) {
return Scaffold(
appBar: AppBar(
title: Text("Second Screen"),
),
body: Center(
child: RaisedButton(
color: Colors.blueGrey,
onPressed: () {
//
},
child: Text('Go back!'),
),
),
);
}
} Step 2: Define the routes.
In this step, we have to define the routes. The MaterialApp constructor is responsible for defining the initial route and other routes themselves. Here the initial route tells the start of the page and routes property defines the available named routes and widgets. The following code explains it more clearly.
MaterialApp(
  title: 'Named Route Navigation',
  theme: ThemeData(
    // This is the theme of your application.
    primarySwatch: Colors.green,
  ),
  // It start the app with the "/" named route. In this case, the app starts
  // on the HomeScreen widget.
  initialRoute: '/',
  routes: {
    // When navigating to the "/" route, build the HomeScreen widget.
    '/': (context) => HomeScreen(),
    // When navigating to the "/second" route, build the SecondScreen widget.
    '/second': (context) => SecondScreen(),
  },
));
Step 3: Navigate to the second screen using the Navigator.pushNamed() function.
In this step, we need to call Navigator.pushNamed() method for navigation. For this, we need to update an onPressed() callback in the build method of HomeScreen like below code snippets.
onPressed: () {
  // Navigate to the second screen by using the named route.
  Navigator.pushNamed(context, '/second');
}
Step 4: Use a Navigator.pop() function to return to the first screen.
It is the final step, where we will use Navigator.pop() method to return on the first screen.
onPressed: () {
  Navigator.pushNamed(context, '/second');
},
Let us see the full code of the above explanation in the Flutter project and run it in the emulator to get the output.
import 'package:flutter/material.dart';

void main() {
  runApp( MaterialApp(
    title: 'Named Route Navigation',
    theme: ThemeData(
      // This is the theme of your application.
      primarySwatch: Colors.green,
    ),
    // Start the app with the "/" named route. In this case, the app starts
    // on the FirstScreen widget.
    initialRoute: '/',
    routes: {
      // When navigating to the "/" route, build the FirstScreen widget.
      '/': (context) => HomeScreen(),
      // When navigating to the "/second" route, build the SecondScreen widget.
      '/second': (context) => SecondScreen(),
    },
  ));
}

class HomeScreen extends StatelessWidget {
  @override
  Widget build(BuildContext context) {
    return Scaffold(
      appBar: AppBar(
        title: Text('Home Screen'),
      ),
      body: Center(
        child: RaisedButton(
          child: Text('Click Here'),
          color: Colors.orangeAccent,
          onPressed: () {
            Navigator.pushNamed(context, '/second');
          },
        ),
      ),
    );
  }
}

class SecondScreen extends StatelessWidget {
  @override
  Widget build(BuildContext context) {
    return Scaffold(
      appBar: AppBar(
        title: Text("Second Screen"),
      ),
      body: Center(
        child: RaisedButton(
          color: Colors.blueGrey,
          onPressed: () {
            Navigator.pop(context);
          },
          child: Text('Go back!'),
        ),
      ),
    );
  }
}
Output
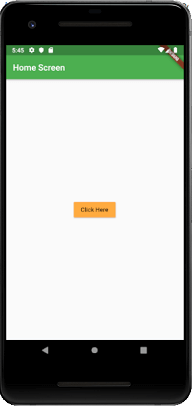
Click the button Click Here, and you will navigate to a second screen as below image. Next, when you click on the button Go Back, it will return to the Home Page.
Leave a Reply